Here's how it works: You install a random 6-digit number generator on your phone. This number changes every 30 seconds. So, to log in to your 2FA-enabled Office 365 email, you'd need your username, password, and this changing 6-digit code.
These instructions take you through the following steps, it is essential that all these steps are followed.
Step 1 – Download Microsoft Authenticator app to your mobile device
Step 2 – Access Office 365 user account online
Step 3 – Configure the Microsoft Authenticator App
Step 4 – Login to Office365 account using 2FA
Step 1 – Download Microsoft Authenticator app to your mobile device
Navigate to your phone's App Store / Play Store and search for the Microsoft Authenticator app. The search results should have found the following apps:
2. Download the Microsoft Authenticator app to your phone.
3. Once the download is complete, a new app icon called Authenticator will appear on your phone.
Step 2 – Access Office 365 user account online
1. Using your computer, open a browser and navigate to https://login.microsoftonline.com
2. Log into Office 365 online with your company email address and password.
3. Your IT Administrator will already have enabled 2FA on your company user account, so you should 3. receive the following prompt asking you to set up 2FA.
4. Click on Next.
5. You will then arrive on the page called Additional Security Verification asking you which security method you would like to use.
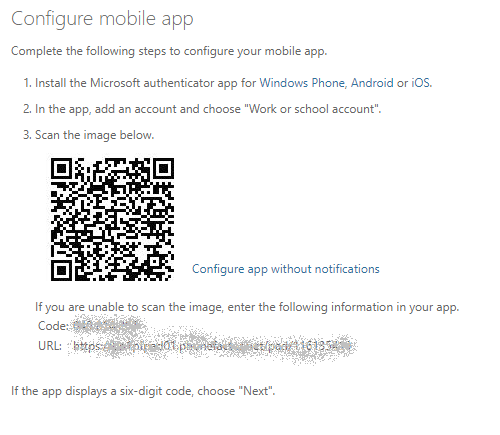
6. Select the option Mobile App from the drop-down list and select Use verification code from the list of choices, click Set up.
7. Once this has been completed you will be displayed with the message below.
Step 3 – Configure the Microsoft Authenticator App
- With your mobile phone in hand, open the Microsoft Authenticator app.
- Skip any intro screens the app may present to you, until you get to the Ready to add your first account? screen or similar.
3. Select Add account or “+” icon in the top right corner of the app screen.
4. Select the option Work or school account.
5. You may be asked to allow the app to use your phone’s camera, click OK to allow this.
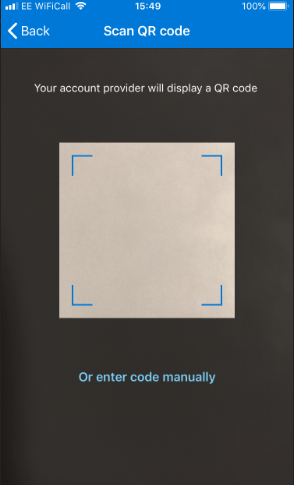
6. You will be presented with a screen called Scan QR code with a square camera box in the centre of the screen.
7. Lift your mobile device so that the QR code on your computer screen sits inside the Scan QR code camera square on your mobile phone.
8. As soon as the Authenticator app has scanned the QR code the following screen will appear on the computer screen. The setup button is greyed out and the Next button is highlighted.
On the Authenticator app on your mobile phone a new account will have been created, displaying a set of 6 digits that updates every 30 seconds. This ever-changing number provides the second authentication factor required for 2FA.
9. Click Next on your computer screen.
10. You will then be prompted for the six-digit verification code from the Authenticator app.
Step 4 – Login to your Office 365 account using 2FA
- Open Outlook on your computer and when prompted enter your company email address (username) and click next.
2. Enter your email address and password then click Next.
3. You will then be prompted to enter the six-digit verification code from the Authenticator app on your phone. Enter the code and your Outlook will run as normal.


